Text Extraction refers to the process of automatically scanning and converting unstructured text into a structured format. It’s one of the most important tasks in natural language processing.
Reading or scanning many documents manually involves a lot of time and effort. For example, the HR department in any company has to look through hundreds of resumes/CVs every month. Bankers also need to spend days inputting invoice data into a system.
What if you want to auto-convert all these documents and store the most useful information in your database?
This issue can be easily tackled by programming with the help of the PyMuPDF library. Our today’s article will guide you through every step needed to fully extract and analyze the text from a PDF document.
We’ll assume that you already have a Python environment (with Python >=3.7). If you are a beginner, please follow this tutorial to set up a proper programming workspace for yourself: Python – Environment Setup. A virtual environment is preferable since we can manage our Python packages.
We also recommend installing the jupyter notebook (Project Jupyter), which is great for showcasing your work. It allows you to see both the code and the results at the same time.
Let’s dive into PyMuPDF, the library needed for text extraction. You can install it by typing in the terminal.
With pip:
pip install pymupdf
And start using the library by importing the installed module:
import fitz
Bear in mind that the top-level Python import name of the PyMuPDF library is fitz. This is due to historical reasons – according to the author
Note: In this blog post, we only work with searchable PDF files. To check whether your pdf file is legit, open it with a pdf reader and try to copy text or search for some words. A searchable pdf file enables you to do the mentioned work, while a scanned pdf cannot. The PyMuPDF library also cannot work with scanned pdf.
Extract Text from PDF
First of all, we need to set a variable to contain the path to our pdf file. Please replace the ‘PATH_TO_YOUR_AWESOME_RESUME_PDF’ with your path:
my_path = ‘PATH_TO_YOUR_AWESOME_RESUME_PDF”
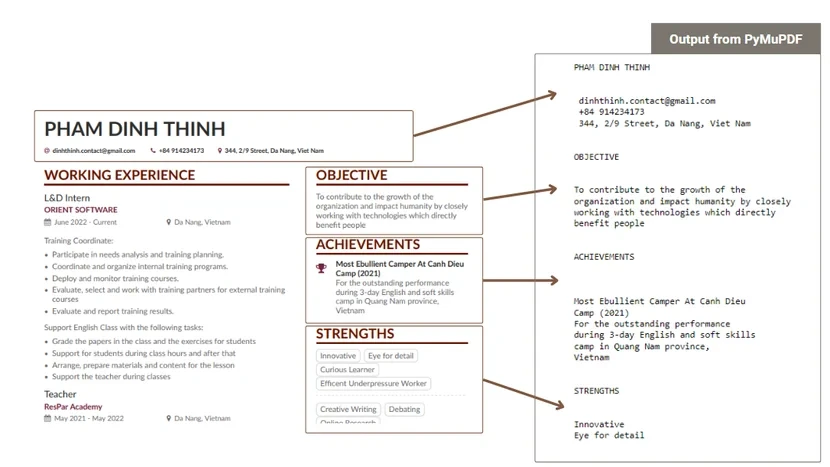
Here is an example of our working PDF. This is a typical Resume PDF containing a candidate’s information such as contact details, summary, objective, education, skills, and work experience sections.
Let’s open with fitz:
doc = fitz.open(my_path)
The “doc” is a PyMuPDF’s Document class representing the whole document. We will get every necessary information from it, including the text. To extract the text, type the following and run in your jupyter notebook or python file:
for page in doc:

    text = page.get_text()

    print(text)
In case we get a multi-page document, we will loop all the pages to get the text plain from the document. Here is the result when we print the output:
The output is quite pretty since the PyMuPDF knows how to read the text in a natural order. However, what if you want to separate particular text blocks? It can be done by passing the parameter “blocks” to the get_text() method.
output = page.get_text(“blocks”)
The output is a list of tuple items, each item will look like this:
The x0, y0, x1, y1 is the coordinate of the text line in the document. The next element is the text itself. “block_no” is the block number and “block_type” indicate this block is a text or image.
From now we only care about the text and block number. All the blocks with the same block_no value will be grouped, so we can start printing the text as follow:
for page in doc:

    output = page.get_text("blocks")

    previous_block_id = 0 # Set a variable to mark the block id

    for a block in output:

        if block[6] == 0: # We only take the text

            if previous_block_id != block[5]: # Compare the block number

                print("\n")

            print(block[4])
You can notice some strange symbols. This is because sometimesthe we get text data in Unicode, but we need to represent it in ASCII. To fix this, we use Unidecode library and pass the string into the unidecode function.
from unidecode import unidecode

output = []

for page in doc:

    output += page.get_text("blocks")

previous_block_id = 0 # Set a variable to mark the block id

for block in output:

     if block[6] == 0: # We only take the text

          if previous_block_id != block[5]: # Compare the block number

              print("\n")

          plain_text = unidecode(block[4])

          print(plain_text)
Now the text we retrieve is similar to what we see in the pdf document. For later development, we can store all of these texts in a DataFrame. To do this, you are required to install Pandas library:
At this point, we already get structured text data that can be used for later NLP tasks such as classification, information extraction, searching, or export it into a sheet file for later development.
Analyze the Text
PyMuPDF lets you extract the text easily in a few lines of code. Frankly, we can achieve more by analyzing more properties of the text. For example, you want to know which line is bigger than the others, or whether the two blocks have the same font style or not. In this way, we can go deeper into what PyMuPDF can provide us.
Before starting, we should understand what “span” is. A span turns out to be an inline container that helps mark up a part of a text or a part of a document. In short, span is a small chunk of text. Every word in a span has the same size, text style, and font style. A document is a combination of many text blocks while a text block is composed of many spans.
To get the spans from the PDF file, pass the parameter “dict” into the get_text() method of the doc object that we have before.
block_dict = {}

page_num = 1

for page in doc: # Iterate all pages in the document

      file_dict = page.get_text('dict') # Get the page dictionary

      block = file_dict['blocks'] # Get the block information

      block_dict[page_num] = block # Store in block dictionary

      page_num += 1 # Increase the page value by 1
The “block_dict” is a dictionary containing detailed information of all spans in a document. Let’s retrieve the spans and store them in a DataFrame as follow:
import re


spans = pd.DataFrame(columns=['xmin', 'ymin', 'xmax', 'ymax', 'text', 'tag'])

rows = []

for page_num, blocks in block_dict.items():

    for block in blocks:

        if block['type'] == 0:

            for line in block['lines']:

                for span in line['spans']:


                    xmin, ymin, xmax, ymax = list(span['bbox'])

                    font_size = span['size']

                    text = unidecode(span['text'])

                    span_font = span['font']


                    is_upper = False

                    is_bold = False


                    if "bold" in span_font.lower():

                        is_bold = True


                    if re.sub("[\(\[].*?[\)\]]", "", text).isupper():

                        is_upper = True


                    if text.replace(" ","") !=  "":

                        rows.append((xmin, ymin, xmax, ymax, text, is_upper, is_bold, span_font, font_size))


span_df = pd.DataFrame(rows, columns=['xmin','ymin','xmax','ymax', 'text', 'is_upper','is_bold','span_font', 'font_size'])
Just a little insight, the code above tries to loop over the page, blocks, and lines in a document. Then we will get every span in a line. Although there are some properties in the spans, we care about the bbox (the bounding box), size, font, and text only. You can check our result in the image below:
We can create more features from these, such as finding the tag for the text. The tag is very significant since it gives you a helping hand in distinguishing between headings and content.
We will define three types of tag: h, p, and s.
The ‘h’ tag denotes the text which is bigger and more important than normal paragraphs. The text with the ‘h’ tag is usually in the UPPER CASE and has the bold style.
The ‘p’ tag stands for paragraph, or the normal content in the document. We can find the proper text with ‘p’ tag by counting the number of occurrences of each text size in a document, and then choose the text size which occurs most.
The ‘s’ tag will be used for less important text, which is smaller than ‘p’ text.
Following this idea, we will start by gathering all the font sizes and styles in the span DataFrame. We will use the term “score” to emphasize the importance of a text span. The base score of each text span is the font size itself, and increase the score by 1 if it is in the upper case or has the bold style. Note that we also want to avoid increasing the score for the text with special symbols.
span_scores = []

span_num_occur = {}

special = '[(_:/,#%\=@)]'


for index, span_row in span_df.iterrows():


    score = round(span_row.font_size)

    text = span_row.text


    if not re.search(special, text):


        if span_row.is_bold:

            score +=1


        if span_row.is_upper:

            score +=1


    span_scores.append(score)


values, counts = np.unique(span_scores, return_counts=True)
From this, we want to know the numer of unique text styles in the document, and the number of its occurrences. The method “unique” from NumPy can do easily. Make sure you install the NumPy library before this step.
import numpy as np
values, counts = np.unique(span_scores, return_counts=True)
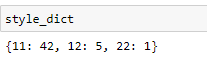
style_dict = {}
for value, count in zip(values, counts):
style_dict[value] = count
sorted(style_dict.items(), key=lambda x: x[1])
The image below represents the result.
We got three text style and their number of occurrences respectively. Any text with the score 11 will be the normal paragraph since they appear frequently in the document, the others with scores (12,22) will be granted the h tag.
p_size = max(style_dict, key=style_dict.get)


idx = 0

tag = {}


for size in sorted(values, reverse = True):

    idx += 1

    if size == p_size:

        idx = 0

        tag[size] = 'p'

    if size > p_size:

        tag[size] = 'h{0}'.format(idx)

    if size < p_size:

        tag[size] = 's{0}'.format(idx)
Finally, we get the proper tag for each style of the text.
From this, we’re able to create a new column in our span dataframe for the tag information.
span_tags = [tag[score] for score in span_scores]

span_df['tag'] = span_tags
That’s it. We’re now clear on which text is the headings and which one is the content in the document. This is very useful when extracting information since we want all paragraphs below a heading will be grouped. Let’s create a new dataframe where we can store the text by headings.
headings_list = []
text_list = []
tmp = []
heading = ''
for index, span_row in span_df.iterrows():
text = span_row.text
tag = span_row.tag
if 'h' in tag:
headings_list.append(text)
text_list.append('\n'.join(tmp))
tmp = []
heading = text
else:
tmp.append(text)
text_list.append('\n'.join(tmp))
text_list = text_list[1:]
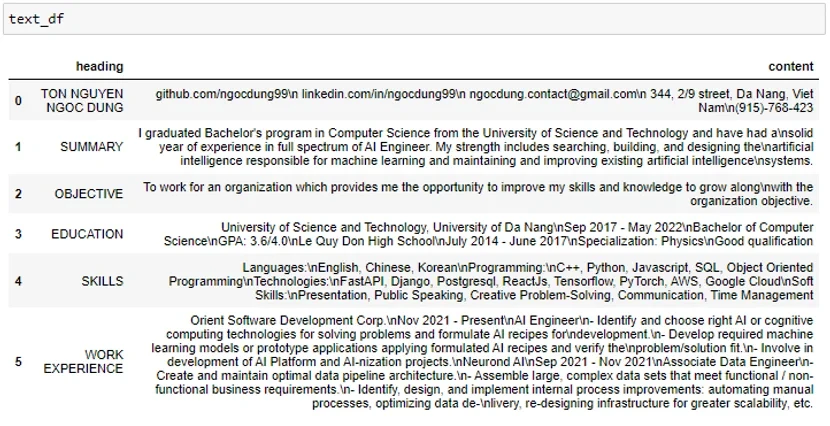
text_df = pd.DataFrame(zip(headings_list, text_list),columns=['heading', 'content'] )
Print the new dataframe we have created and see the result:
Now all the text will be gathered in the same section and heading. This is easier and more meaningful when examining the text in the document. We can quickly find the content we plan to extract. For example, to get all skills in this resume document, we just need to call the section with the heading “Skill”.
Deal with Multi-column Document
We can’t always get a beautiful one-column document. It may result in two or more columns. Fortunately, the PyMuPDF knows how to deal with this problem and permits us to read each column one by one.
Ready to Extract Text from PDF?
We’ve walked you through how PyMuPDF and Python help us with text extraction. It frees you from copying single text lines manually or using a PDF reade. Hundreds of documents can be auto-extracted and organized in a structured format.
There is still a lot of work to do in the future, like how can we process a scanned PDF file. This requires implementing OCR (Optical Character Recognition) to read and extract the text from images.
Learn how we apply text extraction in a real project via DrParser!
Trinh Nguyen
I'm Trinh Nguyen, a passionate content writer at Neurond, a leading AI company in Vietnam. Fueled by a love of storytelling and technology, I craft engaging articles that demystify the world of AI and Data. With a keen eye for detail and a knack for SEO, I ensure my content is both informative and discoverable. When I'm not immersed in the latest AI trends, you can find me exploring new hobbies or binge-watching sci-fi
CV screening, without a doubt, proves the most important but time-consuming stage in the hiring cycle. It requires recruiters to go through all resumes and re-enter the data into tracking excel sheets to identify the best candidates from the crowd. Still, not only does this repetitive task take time and exhaust recruiters, but it’s also […]